phone (632) 7753.18.14
REQUEST QUOTE
email sales@cid-systems.com

29

May, 2019

How to Setup Outlook 365 Manually

Posted by : Cid Systems   

May 29, 2019
How to Setup Outlook 365 Manually

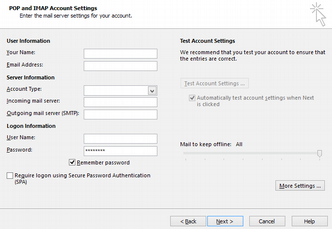
This Article will guide you on How to Setup Outlook 365 Manually.

  1. Open control panel then click category and choose small icons.
  2. Select Mail.
  3. A new window will appear on the screen, click add to add a profie.
  4. Now, in the opened window, select Manual setup and click next.
  5. Select POP or IMAP and click next.
  6. Fill the required fields and go to More Settings to add the server details manually and click next.

    User Information
    Your Name: example
    Email Address: example@yourdomainname.com

    Service Information
    Account Type: POP3/IMAP
    Incoming mail server: mail.yourdomainname.com
    Outgoing mail server: mail.yourdomainname.com

    Logon Information
    User Name: your email address
    Password: ********

  7. Click Remember password.
  8. Next click More Settings.
  9. Click the tab for Outgoing Server and make sure the box for “My outgoing server (SMTP) requires authentication” is checked.
  10. Use same settings as my incoming mail server” needs to be selected.
  11. Click the Advanced tab.
  12. Check if you are using the correct ports and encryption. The default settings are:
    • Incoming server (IMAP) – port 993 or port 995 for (POP) – encryption SSL/TLS
    • Outgoing server (SMTP) – port 25 or 26 – encryption SSL/TLS
  13. Check if you have entered INBOX as the Root folder path.
  14. Click OK thenclick Next.
  15. Outlook will now test the account settings. Click close when they are completed.
  16. Click Finish to complete the setup.